剑指ConcurrentSkipListMap

上一篇文章给大家详细介绍了下跳表的概念,还不清楚的小伙伴可以去看看,跳表(SkipList)了解下?

回顾

这里再贴下跳表结构图以及插入节点的GIF图,大家再眼熟下:

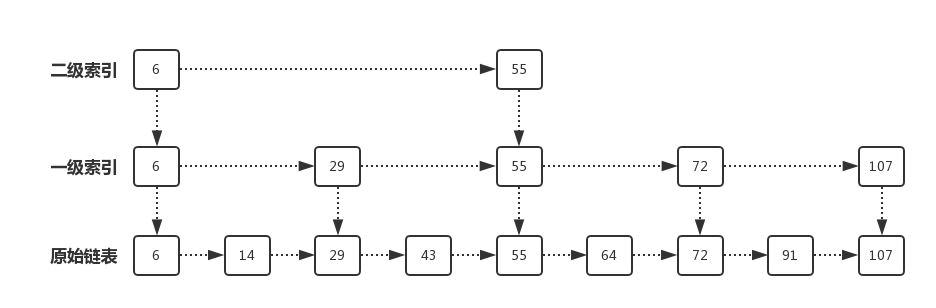
通过之前的学习,我们知道跳表采用空间换时间的算法,他的插入和查找的效率O(logn),效率不低于红黑树,但是其原理和实现的复杂度要比红黑树简单多了。一般来说会操作链表List,就会对SkipList毫无压力。

ConcurrentSkipListMap数据结构

从名字就可以猜到,ConcurrentSkipListMap的数据结构使用的是跳表,看下ConcurrentSkipListMap的数据结构图:

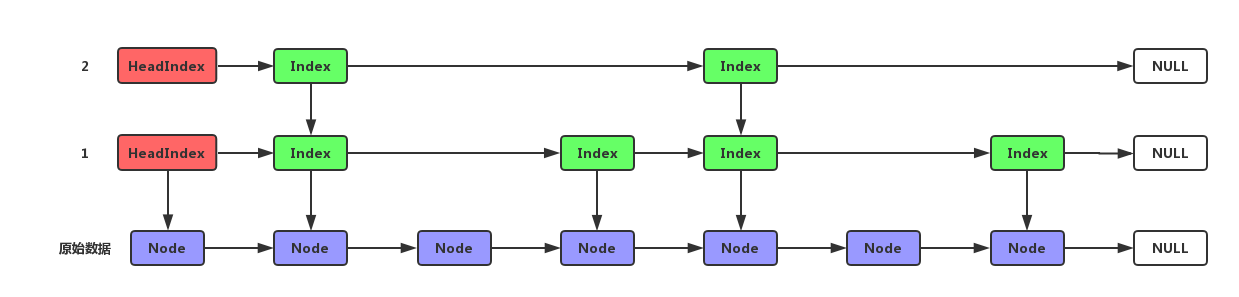
其实ConcurrentSkipListMap头部注解也画了个图:

重要的内部类

ConcurrentSkipListMap包含了很多内部类,下面我们介绍3个重要的内部类:Index、HeadIndex、Node。

其实看上面的数据结构图就知道了这三个内部类主要是干嘛的了

Index

1
2
3
4
5
6
7
8
9
10
11
12
13
14
15
16
17
18
19
20
21
22
static class Index<K,V> {
final Node<K,V> node;
final Index<K,V> down;
volatile Index<K,V> right;

// Unsafe mechanics
private static final sun.misc.Unsafe UNSAFE;
private static final long rightOffset;
static {
try {
UNSAFE = sun.misc.Unsafe.getUnsafe();
Class<?> k = Index.class;
rightOffset = UNSAFE.objectFieldOffset
(k.getDeclaredField("right"));
} catch (Exception e) {
throw new Error(e);
}
}

...

}

可以看到,Index节点包括一个Node节点的引用、一个指向下层的down域和一个指向下一个Index的right域,即对应数据结构中的Index节点。sun.misc.Unsafe这个包熟悉吧?CAS嘛,不清楚的同学可以去看看我写的 CAS机制是什么鬼? 修改right域的时候确保原子性。

HeadIndex

1
2
3
4
5
6
7
8
9
10
/**
* Nodes heading each level keep track of their level.
*/
static final class HeadIndex<K,V> extends Index<K,V> {
final int level;
HeadIndex(Node<K,V> node, Index<K,V> down, Index<K,V> right, int level) {
super(node, down, right);
this.level = level;
}
}

配合数据结构图可以知道,HeadIndex主要是表示当前层级的,继承自Index类,并且在Index类的基础上添加了level域。

Node

1
2
3
4
5
6
7
8
9
10
11
12
13
14
15
16
17
18
19
20
21
22
23
24
25
26
27
28
29
static final class Node<K,V> {
// 键
final K key;
// 值
volatile Object value;
// 下一个节点
volatile Node<K,V> next;

// UNSAFE mechanics

private static final sun.misc.Unsafe UNSAFE;
// value域的偏移地址
private static final long valueOffset;
// next域的偏移地址
private static final long nextOffset;

static {
try {
UNSAFE = sun.misc.Unsafe.getUnsafe();
Class<?> k = Node.class;
valueOffset = UNSAFE.objectFieldOffset
(k.getDeclaredField("value"));
nextOffset = UNSAFE.objectFieldOffset
(k.getDeclaredField("next"));
} catch (Exception e) {
throw new Error(e);
}
}
}

Node就是存放原始数据的节点了,包含了key、value、next域,链表结构,同样使用CAS确保修改value和next的原子性。

属性

1
2
3
4
5
6
7
8
9
10
11
12
13
14
15
16
17
18
19
20
21
22
23
24
25
26
27
28
29
30
31
32
33
34
35
36
37
38
39
40
public class ConcurrentSkipListMap<K,V> extends AbstractMap<K,V>
implements ConcurrentNavigableMap<K,V>, Cloneable, Serializable {
// 版本序列号
private static final long serialVersionUID = -8627078645895051609L;
// 基础层的头节点
private static final Object BASE_HEADER = new Object();
// 最顶层头节点的索引
private transient volatile HeadIndex<K,V> head;
// 比较器
final Comparator<? super K> comparator;
// 键集合
private transient KeySet<K> keySet;
// entry集合
private transient EntrySet<K,V> entrySet;
// 值集合
private transient Values<V> values;
// 降序键集合
private transient ConcurrentNavigableMap<K,V> descendingMap;

// Unsafe mechanics
private static final sun.misc.Unsafe UNSAFE;
// head域的偏移量
private static final long headOffset;
// Thread类的threadLocalRandomSecondarySeed的偏移量
private static final long SECONDARY;
static {
try {
UNSAFE = sun.misc.Unsafe.getUnsafe();
Class<?> k = ConcurrentSkipListMap.class;
headOffset = UNSAFE.objectFieldOffset
(k.getDeclaredField("head"));
Class<?> tk = Thread.class;
SECONDARY = UNSAFE.objectFieldOffset
(tk.getDeclaredField("threadLocalRandomSecondarySeed"));

} catch (Exception e) {
throw new Error(e);
}
}
}

构造函数

四个构造函数

1
2
3
4
5
6
7
8
9
10
11
12
13
14
15
16
17
18
19
20
21
22
23
24
25
26
27
28
29
30
31
32
33
34
35
36
37
38
39
40
41
42
43
44
45
46
47
48
49
50
51
52
53
/**
* Constructs a new, empty map, sorted according to the
* {@linkplain Comparable natural ordering} of the keys.
*/
public ConcurrentSkipListMap() {
this.comparator = null;
initialize();
}

/**
* Constructs a new, empty map, sorted according to the specified
* comparator.
*
* @param comparator the comparator that will be used to order this map.
* If {@code null}, the {@linkplain Comparable natural
* ordering} of the keys will be used.
*/
public ConcurrentSkipListMap(Comparator<? super K> comparator) {
this.comparator = comparator;
initialize();
}

/**
* Constructs a new map containing the same mappings as the given map,
* sorted according to the {@linkplain Comparable natural ordering} of
* the keys.
*
* @param m the map whose mappings are to be placed in this map
* @throws ClassCastException if the keys in {@code m} are not
* {@link Comparable}, or are not mutually comparable
* @throws NullPointerException if the specified map or any of its keys
* or values are null
*/
public ConcurrentSkipListMap(Map<? extends K, ? extends V> m) {
this.comparator = null;
initialize();
putAll(m);
}

/**
* Constructs a new map containing the same mappings and using the
* same ordering as the specified sorted map.
*
* @param m the sorted map whose mappings are to be placed in this
* map, and whose comparator is to be used to sort this map
* @throws NullPointerException if the specified sorted map or any of
* its keys or values are null
*/
public ConcurrentSkipListMap(SortedMap<K, ? extends V> m) {
this.comparator = m.comparator();
initialize();
buildFromSorted(m);
}

可以看到都调用了initialize()方法,进行初始化工作。

1
2
3
4
5
6
7
8
private void initialize() {
keySet = null;
entrySet = null;
values = null;
descendingMap = null;
head = new HeadIndex<K,V>(new Node<K,V>(null, BASE_HEADER, null),
null, null, 1);
}

put操作

简单判断下非空,然后执行doPut()函数,看过JDK源码的应该很熟悉这种操作了。

1
2
3
4
5
public V put(K key, V value) {
if (value == null)
throw new NullPointerException();
return doPut(key, value, false);
}

doPut()源码很多,咋们拆开来看。

1
2
3
4
5
6
7
8
9
10
11
private V doPut(K key, V value, boolean onlyIfAbsent) {
Node<K,V> z; // added node
if (key == null) // 键为空,抛出空异常
throw new NullPointerException();
// 比较器
Comparator<? super K> cmp = comparator;
// 死循环,打个标记outer,可通过break outer跳出循环
outer: for (;;) {
for (Node<K,V> b = findPredecessor(key, cmp), n = b.next;;) {

......

可以看到doPut有三个入参K、V、onlyIfAbsent。KV大家都知道,这个boolean类型的onlyIfAbsent的作用是如果存在当前key时,该做何动作?当onlyIfAbsent为false时,替换value,为true时,则返回该value。

主题其中还调用了findPredecessor()方法,传入key来确认位置,该方法就是确认key插入位置的。
findPredecessor()源码如下:

1
2
3
4
5
6
7
8
9
10
11
12
13
14
15
16
17
18
19
20
21
22
23
24
25
26
27
28
29
30
31
32
33
34
35
36
37
38
39
40
41
42
private Node<K,V> findPredecessor(Object key, Comparator<? super K> cmp) {
if (key == null) // 键为空,抛出空异常
throw new NullPointerException(); // don't postpone errors
for (;;) { //死循环
// 从head节点开始,head是level最高级别的headIndex
for (Index<K,V> q = head, r = q.right, d;;) {
// r != null,表示该节点右边还有节点,需要比较
if (r != null) {
// n为当前Node节点
Node<K,V> n = r.node;
// 为当前key
K k = n.key;
// value == null,表示该节点已经被删除了
if (n.value == null) {
// 通过unlink()方法过滤掉该节点
if (!q.unlink(r))
break; // restart
// r为rightIndex节点
r = q.right; // reread r
continue;
}

// value != null,节点存在
// 如果key 大于r节点的key 则往前进一步
if (cpr(cmp, key, k) > 0) {
// 向右移动
q = r;
r = r.right;
continue;
}
}

// 到达最右边,如果dowm == null,表示指针已经达到最下层了,直接返回q对应的Node节点
if ((d = q.down) == null)
return q.node;
// 向下移动
q = d;
// d的right节点
r = d.right;
}
}
}

findPredecessor()方法就是寻找前辈节点。从最高层HeadIndex开始向右一个个比较,直到right域为null或者右边的key大于当前的key,然后通过down域向下寻找,直到down为null,找到后返回原始数据的Node节点。

这个过程中还会执行另一个操作unlink(),判断节点的value是否为null,如果为null,表示该节点已经被删除了,通过调用unlink()方法删除该节点。

OK,现在通过findPredecessor()方法找到前辈节点后,继续走。

1
2
3
4
5
6
7
8
9
10
11
12
13
14
15
16
17
18
19
20
21
22
23
24
25
26
27
28
29
30
31
32
33
34
35
36
37
38
39
40
41
42
43
44
45
46
47
48
49
50
51
// 无限循环
outer: for (;;) {
// 找到前辈节点,n为当前节点
for (Node<K,V> b = findPredecessor(key, cmp), n = b.next;;) {
// 前辈节点的next != null
if (n != null) {
Object v; int c;
// f为当前节点的后继节点
Node<K,V> f = n.next;
// 不一致读,主要原因是并发,有节点捷足先登,重试
if (n != b.next) // inconsistent read
break;
/ n.value == null,该节点已经被删除了
if ((v = n.value) == null) { // n is deleted
// 进行删除
n.helpDelete(b, f);
break;
}
// 前辈节点b已经被删除
if (b.value == null || v == n) // b is deleted
break;
// key大于节点的key
if ((c = cpr(cmp, key, n.key)) > 0) {
// b往后移动
b = n;
// n往后移动
n = f;
continue;
}

// c == 0 表示,找到一个key相等的节点,根据onlyIfAbsent参数来做判断
// onlyIfAbsent ==false,则通过casValue,替换value
// onlyIfAbsent == true,返回该value
if (c == 0) {
if (onlyIfAbsent || n.casValue(v, value)) {
@SuppressWarnings("unchecked") V vv = (V)v;
return vv;
}
break; // restart if lost race to replace value
}
// else c < 0; fall through
}

// 将key、value包装成一个node,插入
z = new Node<K,V>(key, value, n);
if (!b.casNext(n, z)) // CAS比较并交换next域
break; // restart if lost race to append to b
// 成功,则跳出循环
break outer;
}
}

找到前辈节点后,通过以上步骤找到合适的位置插入节点。new一个Node节点通过casNext()方法加入到原始数据Node链表中。

在原始数据插入节点后,还远远不够,毕竟这是跳表,不是链表。还需要新建Index索引,新建Index之前,还需要确认新节点的高度(level),所以就采用如下方式来生成随机数。

1
int rnd = ThreadLocalRandom.nextSecondarySeed();

生成随机数之后进行判断,0x80000001这个数字比较特殊,为-2147483647,生成随机数为正偶数才会更新层级(通过最高位和最低位不为1验证)。

1
2
3
4
5
6
7
8
9
if ((rnd & 0x80000001) == 0) { // test highest and lowest bits
int level = 1, max;
while (((rnd >>>= 1) & 1) != 0) // 判断从右到左有多少个连续的1
++level;
Index<K,V> idx = null;

...

}

之后的while循环用来计算跳表的level,level等于从低2位开始向左有多少个连续的1的个数。
算出level之后,会有两种情况,一是level高于最高层次的话就需要新增一层,二是小于等于当前最高层次。

1
2
3
4
5
6
7
8
9
10
11
12
13
14
15
16
17
18
19
20
21
22
23
24
25
26
27
28
29
30
31
32
33
34
35
36
37
38
39
40
41
42
43
44
// idx:新添加的index的level层index
Index<K,V> idx = null;
// 保存头节点
HeadIndex<K,V> h = head;
// 构建Index逻辑
if (level <= (max = h.level)) { // 不需要增加层级
for (int i = 1; i <= level; ++i)
// 从下到上构建,节点持有新节点z和down节点idx的引用
idx = new Index<K,V>(z, idx, null);
}
else { // try to grow by one level
// 构建新层级(旧层级+1)
level = max + 1; // hold in array and later pick the one to use
// 构建一个level+1长度的Index数组,idxs[0]不作使用
@SuppressWarnings("unchecked")Index<K,V>[] idxs =
(Index<K,V>[])new Index<?,?>[level+1];
// 从下到到上构建新的头结点Index,并赋值down域
for (int i = 1; i <= level; ++i)
idxs[i] = idx = new Index<K,V>(z, idx, null);
// 死循环
for (;;) {
h = head;
// 保存跳表之前的层级
int oldLevel = h.level;
// 层次扩大了,需要重新开始(有新线程节点加入)
if (level <= oldLevel) // lost race to add level
break;

// 保存头结点
HeadIndex<K,V> newh = h;
// 保存头结点对应的Node结点
Node<K,V> oldbase = h.node;
// 生成新的HeadIndex节点,该HeadIndex指向新增层次
for (int j = oldLevel+1; j <= level; ++j)
newh = new HeadIndex<K,V>(oldbase, newh, idxs[j], j);
// CAS比较并替换头结点
if (casHead(h, newh)) {
h = newh;
// idx赋值为之前层级的头节点,并将level赋值为之前的层级
idx = idxs[level = oldLevel];
break;
}
}
}

当level小于等于当前层级,就会从下到上构建,每一层初始化一个Index,该Index的down域指向下一层的节点,right域为null,node直线新插入的Node。
当level大于当前层级时,就新增一层。就行以下逻辑操作:
1.初始化一个长度为level+1长度的Index数组, 从下到到上构建新的节点Index,并赋值down域right域node域。
2.通过一个死循环,从最高层处理,新增一个HeadIndex,该HeadIndex的node域指向之前的最高层的Node,right域指向刚才常见的对应层次的Index,level为当前层次,down域指向前的最高层的HeadIndex。最后通过CAS操作吧当前的head与新加入层的head进行替换。

通过以上步骤,我们已经将Node插入到原始数据链表,确定了level,并且生成了相应的Index以及HeadIndex。现在还差最后一步了,就是把这些Index插入到相对应的层中。

1
2
3
4
5
6
7
8
9
10
11
12
13
14
15
16
17
18
19
20
21
22
23
24
25
26
27
28
29
30
31
32
33
34
35
36
37
38
39
40
41
42
43
44
45
46
47
48
49
50
51
52
53
54
55
56
57
58

// find insertion points and splice in
// 插入Index
splice: for (int insertionLevel = level;;) {
// 获取新跳表head的层级
int j = h.level;
// q:新跳表head; r:q.right; t:新增的Index节点
for (Index<K,V> q = h, r = q.right, t = idx;;) {
// 头节点或者idx节点为空
if (q == null || t == null)
// 跳出外层循环
break splice;
// right节点不为空
if (r != null) {
// 保存r对应的Node节点
Node<K,V> n = r.node;
// compare before deletion check avoids needing recheck
// 比较key与节点的key值
int c = cpr(cmp, key, n.key);
// 节点的值为空,表示需要删除
if (n.value == null) {
// 删除q的right节点r,并替换为r.right
if (!q.unlink(r))
break;
// r为q的right节点
r = q.right;
continue;
}
// key大于节点的key,向右寻找
if (c > 0) {
q = r;
r = r.right;
continue;
}
}
// 新跳表head层级等于旧跳表head层级
if (j == insertionLevel) {
// 把新增节点插入q和r之间
if (!q.link(r, t))
break; // restart
// t节点的值为空,需要删除
if (t.node.value == null) {
// 利用findNode函数的副作用,清除已删除的节点
findNode(key);
break splice;
}
// 到达最底层,插入完毕,退出循环
if (--insertionLevel == 0)
break splice;
}

// 上面节点已经插入完毕了,插入下一个节点,移动到下一层level
if (--j >= insertionLevel && j < level)
t = t.down;
q = q.down;
r = q.right;
}
}

这段源码主要是有两步,一是找到相应层次的该节点插入的位置,第二部分在该位置插入,然后下移。

到这里put操作就结束了,代码量还是很多的,理解了就行,稍微总结下。

1.先通过findPredecessor()方法找到前辈节点Node,这个过程会通过unlink()方法删除一些已经被标记的节点。
2.找到前辈节点后,新建Node节点插入到原始数据链表中。
3.随机生成一个数,判定是否需要添加该跳表的层级,并生成插入Node的Index和HeadIndex。
4.将生成的Index链表插入到跳表结构中。

get操作

看源码:

1
2
3
4
5
6
7
8
9
10
11
12
13
14
15
16
17
18
19
20
21
22
23
24
25
26
27
28
29
30
private V doGet(Object key) {
if (key == null)
throw new NullPointerException();
Comparator<? super K> cmp = comparator;
outer: for (;;) {
for (Node<K,V> b = findPredecessor(key, cmp), n = b.next;;) {
Object v; int c;
if (n == null)
break outer;
Node<K,V> f = n.next;
if (n != b.next) // inconsistent read
break;
if ((v = n.value) == null) { // n is deleted
n.helpDelete(b, f);
break;
}
if (b.value == null || v == n) // b is deleted
break;
if ((c = cpr(cmp, key, n.key)) == 0) {
@SuppressWarnings("unchecked") V vv = (V)v;
return vv;
}
if (c < 0)
break outer;
b = n;
n = f;
}
}
return null;
}

代码量直接比put操作少三分之二了,简单了很多,过程就和doPut操作的第一步差不多。

通过findPredecessor()方法找到前辈节点,然后从前驱结点开始往后查找,找到与key相等的结点,则返回该结点,否则,返回null。在这个过程中会删除一些已经标记为删除状态的结点。

remove操作

1
2
3
4
5
6
7
8
9
10
11
12
13
14
15
16
17
18
19
20
21
22
23
24
25
26
27
28
29
30
31
32
33
34
35
36
37
38
39
40
41
42
43
44
45
46
47
48
49
50
51
52
53
54
55
56
57
58
final V doRemove(Object key, Object value) {
if (key == null)
throw new NullPointerException();
Comparator<? super K> cmp = comparator;
outer: for (;;) {
// 找到给定key节点的前辈节点
for (Node<K,V> b = findPredecessor(key, cmp), n = b.next;;) {
Object v; int c;
if (n == null)
break outer;
Node<K,V> f = n.next;
// 不一致读,重新开始
if (n != b.next) // inconsistent read
break;
if ((v = n.value) == null) { // n is deleted
// 帮助清除已删除节点
n.helpDelete(b, f);
break;
}
// b节点已删除
if (b.value == null || v == n) // b is deleted
break;
// key小于当前结点的key,跳出循环
if ((c = cpr(cmp, key, n.key)) < 0)
break outer;
// key大于当前结点的key,后移
if (c > 0) {
b = n;
n = f;
continue;
}

// 找到节点
// value != null 表示需要同时校验key-value值
if (value != null && !value.equals(v))
break outer;
// CAS替换value为null
if (!n.casValue(v, null))
break;
// 给节点添加删除标识(next节点改为一个指向自身的节点)
// 然后把前辈节点的next节点CAS修改为next.next节点(彻底解除n节点的链接)
if (!n.appendMarker(f) || !b.casNext(n, f))
// 如果CAS失败,清除已删除的节点后重新循环
findNode(key); // retry via findNode
else {
// 清理节点
findPredecessor(key, cmp); // clean index
if (head.right == null)
// 减少跳表层级
tryReduceLevel();
}
// 返回对应value
@SuppressWarnings("unchecked") V vv = (V)v;
return vv;
}
}
return null;
}

doRemove操作和get差不多,找到需要删除节点的前辈节点,如果在查找过程中发现有已经删除的节点,就帮助清除节点。找到后不会直接删除,先利用 CAS 给这个节点添加一个删除标识(next 节点改为一个指向自身的节点),然后再利用 CAS 解除它的链接;如果途中 CAS 执行失败,则调用findNode方法来清除已经删除的节点。

最后检查该节点是不是这层唯一的index,如果是的话,调用tryReduceLevel()方法把这层干掉,完成删除。

从remove源码可以看出,remove方法仅仅是把Node的value设置null,并没有真正删除该节点Node,其实从上面的put操作、get操作我们可以看出,他们在寻找节点的时候都会判断节点的value是否为null,如果为null,则调用unLink()方法取消关联关系,完成删除操作。

tryReduceLevel降级操作

remove里面的删除层级操作。

如果最高的前三个HeadIndex不为空,并且其right域都为null,那么就将level减少1层,并将head设置为之前head的下一层,设置完成后,还有检测之前的head的right域是否为null,如果为null,则减少层级成功,否则再次将head设置为h。

h.level > 3代表跳表只有在层级大于3时才可以降级。

1
2
3
4
5
6
7
8
9
10
11
12
13
14
private void tryReduceLevel() {
HeadIndex<K,V> h = head;
HeadIndex<K,V> d;
HeadIndex<K,V> e;
if (h.level > 3 &&
(d = (HeadIndex<K,V>)h.down) != null &&
(e = (HeadIndex<K,V>)d.down) != null &&
e.right == null &&
d.right == null &&
h.right == null &&
casHead(h, d) && // try to set
h.right != null) // recheck
casHead(d, h); // try to backout
}

OK,这篇文章到此也就结束了,ConcurrentSkipListMap过程不算复杂,重要的还是理解。

如果你觉得这篇文章对你有用,欢迎赞赏哦~
本文结束啦 感谢您阅读
0%